Create Group Policy ADM and ADMX templates

An ADM template displayed in the Group Policy editor

The easiest way to create an ADMX template is to build an ADM template first and then convert the latter with the help of Microsoft’s free ADMX Migrator tool.

Administrative templates let us create custom Group Policy settings. Administrative template files have two different versions. Windows Vista introduced templates with the .ADMX extension. These templates use an XML syntax and can be a lot more difficult to decipher and create by hand. On the other hand, templates with the .ADM extension are straightforward and have a simple syntax that allows you to create new Group Policy templates quickly.

Read More

Download files from Github without Git using PowerShell

Have you ever needed to download code or a repository from Github, but didn’t want to download and install Git on a machine, create an SSH key, etc. If so, I have something that you may like.

You can find the entire function here: https://github.com/MSAdministrator/GetGithubRepository

To use this function, you will need to know the path to the Github repository (of course) you want to download.  Once you have that URL, you will need to pass each piece of the URL into a parameter on the function.

For example, let’s take a URL like https://github.com/MSAdministrator/WriteLogEntry.  This URL can be broken down as follows

  • MSAdministrator = Owner
  • WriteLogEntry = Repository

We also know that we want to download the “master” branch of this repository.  The next part is that we need to gather a list of files/paths that we need to download as well.  These will be passed as an array of strings to the FilePath parameter.

  • Branch = Master (unless you want a different branch)
  • FilePath = (Files and paths you want to download)

By default this function will always get the master branch of the repository you are wanting to download, but you can specify a different branch if wanted.  Additionally, this function will download the specified files to your user profiles Module Path (C:\users\some_user\Documents\WindowsPowerShell\Modules)

To use this function, you will need to pass the following values as parameters to the function.  For example, to download my WriteLogEntry repository you will need to call the function like so:
Get-GithubRepository -Owner MSAdministrator -Repository WriteLogEntry -Verbose -FilePath `
'WriteLogEntry.psm1',
'WriteLogEntry.psd1',
'Public',
'en-US',
'en-US\about_WriteLogEntry.help.txt',
'Public\Write-LogEntry.ps1'

I hope that this function helps some of you who want to quickly download a Github repository without installing or using Git.  If you have issues or like this function, please submit issues or fork requests to my Github.

Enjoy!

Original Image here:

Windows Security: Server Hardening (Security Templates)

Hardening your systems (Servers, Workstations, Applications, etc.) ensures that every system is secured in accordance to your organizations standards.  Microsoft has a “Solution Accelerator” called Security Compliance Manager that allows System Administrators or IT Pro’s to create security templates that help harden their systems in a manageable, repeatable, way.  In addition to SCM, you can build your own by using the standard MMC console and adding the Security Templates Snap-In to the console – this gives you a more refined configuration, but can be cumbersome.

Microsoft Security Compliance Manager

With Security Compliance Manager you are able to view Microsoft’s (along with experts in the field) recommended security baseline configurations.  With this knowledge you are able to view their recommendations, thus improving your system hardening.  When installing SCM 3.o (http://technet.microsoft.com/en-us/solutionaccelerators/cc835245.aspx) you will need to have SQL Express installed, which the application takes care if you don’t have it currently installed.

Once the application is running you will see three main content windows.  The first is the list of all variations of configurations by Microsoft (note the “Other Baselines” at the bottom).  In the center pane you are greeted by the “Welcome Screen” – the first step I always do when installing SCM is to click on “Download Microsoft baselines automatically”.  By doing this, it should download the most recent configuration settings.

Once they are downloaded, you should see more options in the first pane (Microsoft Baselines). Next, select the baseline “root” that you want to examine and then select a specific configuration section within that baseline.  Once doing so, you should see tons of settings that apply to that configuration (this is similar to Group Policy Objects) and if you select one of these “GPOish” settings you will see further detail.

Now, if you’ve selected an item in the center pane then you should have noticed the far right pane change – this is the action pane.  The action pane is similar to all other Microsoft products and allows you take certain actions as necessary.

For Example:

    1. Launch SCM 3.0
    2. Click on “Download Microsoft baselines automatically”
    3. Next select Windows 8.1 (expand the arrow)
    4. You should see something similar to this

2014-10-19 14_20_17-Microsoft Security Compliance Manager


  1. Next, select “Windows 8.1 Computer Security Compliance 1.0”
  2. You should see tons of options in the center pane – select the very first option (Interactive Logon: Machine account lockout threshold)
  3. You may notice that everything is grayed out.  To make changes at this point you will need to duplicate this setting.  When doing this, it will add it to your “Other Baselines” option at the bottom of the left-side pane (Don’t do this now).
  4. Do you see the option underneath this setting (when selected) that says “Setting Details” – select this now.
  5. Within this section you see more detailed information that relates to the:
    1. GPO Path
    2. Description of this setting
    3. Additional Details
    4. Vulnerabilities related to this setting
    5. Potential Impacts of this setting
    6. Countermeasures that can be taken

The best part of the Security Compliance Manager is that you can import a backup on your Group Policy Objects to identify weaknesses and strengths of your current configurations.  The ability to compare your current Group Policy settings makes SCM the ideal tool to identify security threats to your organization.

Once importing settings into the SCM Console you are able to generate changes and create Group Policy Security Templates that you can then apply to your Domain or Local Group Policy.  It’s ideal to base this off of your current configurations, but you could go through all of these settings and create a custom Security Template from scratch if you are so inclined.

INF Templates with MMC

Besides using Microsoft Security Compliance Manager, you can also create Security Templates by using the standard Windows MMC (Microsoft Management Console) console.  With this option, you are able to create INF templates which will allow you to configure specific settings for lets say an IIS, Domain Controller, Hyper-V, etc. server.  When you create these Security Templates, then you know that every (IIS, DC, Hyper-V) server has a very specific configuration from the beginning, thus ensuring that all of your configurations are the same across the entire domain/forest/network.

  • Open MMC.exe
  • Go to File -> Add/Remove Snap-In…
  • Select “Security Templates”
  • Click Add
  • Click Ok
  • Expand “Security Templates” – you should see a path similar to the following
    • C:\Users\%USERNAME%\Documents\Security\Templates
  • Right click on this path and select -> New Template
  • Give the Template a name and a brief description (if needed)
  • You should now see your newly created Security Template underneath the path above

You have several different options within this “Security Template”, and each has a very specific purpose.  For example, the “System Services” section is used to enable or disable specific services that are set automatically by your default image (or Microsoft).  On an IIS server, you DO NOT need most of these services running – this leads to unwanted configurations and possibility of exploitation.  Using “Security Templates” ensures that your systems are properly configured.

Another example of “Security Templates” settings is the “Registry” setting.  The “Registry” setting allows you to configure permissions for certain Registry Hives (i.e. SAM, HARDWARE, SYSTEM, SECURITY, SOFTWARE, Etc.).  To add specific permissions (hardening) to Registry hives/keys, you must right-click the “Registry” setting and select “Add Key”.

Using INF Security Templates can greatly reduce unwanted configurations of systems/services/applications, but you must understand and test these configurations before deploying them.  Once you have tested your INF Security Templates you can then deploy them using Group Policy or PowerShell.

Using Security Templates from Microsoft and the Security Compliance Manager allows for a more robust configuration that has been proven to reduce your security risk.  If you’re wanting a bit more of a custom approach or wanting to experiment, you can create very precise Security Templates using the built-in MMC console.  Either way, creating a standard “Golden” image with a predefined Security Template will reduce errors by busy SysAdmins as well as ensuring that every system has the appropriate configurations applied without “admin” interaction.

Additional Info:

  • Look at C:\Windows\Inf for built-in Security Templates to help you on your way
  • Checkout the Security Compliance Manager site for more information: http://technet.microsoft.com/en-us/solutionaccelerators/cc835245.aspx
  • Check out this quick write-up: http://www.techrepublic.com/blog/it-security/use-ms-security-compliance-manager-to-secure-your-windows-environment/ (it’s a bit older, but its a good read)
  • Check out this video: http://www.windowsecurity.com/articles-tutorials/windows_os_security/Video-Security-Compliance-Manager-25-Understanding-Baselines.html


Windows Security: Patch Management Strategy

Recently, at work, I nominated myself to begin a “Windows Security” course for IT Professionals that I work with.  Being a former IT Pro, and now part of our security department as an Incident Responder, I thought I would create a course surrounding security.  So, i’m going to use my blog to layout my plans for this “Windows Security” course – which will hopefully be useful for others as well.

My first post is going to focus on “Patch Management”.  Many IT Pro’s, SysAdmins, etc. deploy assets (systems, applications, services, etc.) and join them to their domain, all while not being patched.  Having assets that are not fully patched is a major security risk for your organization.  Imagine, you have server that’s not fully patched you’ve deployed (or someone else) on a Friday afternoon and then you become busy because of another incident.  Monday comes along and your slammed again – once again you forget about this server for some period of time.  We’ve all seen this happen or know of someone who does this.

In this situation, your Patch Management strategy is of the utmost importance.  Having this server on your network is a major security risk, but not if you have a fully patched image.  Whether you are using a fat, thin, zero-touch imaging solution, you need to make sure that your images are up to date and ready to deploy.

Using Microsoft Deployment Toolkit or SCCM (System Center Configuration Manager), can solve this problem with little to no interaction needed.  I’m personally a fan of MDT (check out my walk-through) in an large, decentralized, environment.  Utilizing MDT for your servers is extremely easy and gives your “System Administrators” a flexible and reliable solution for the many configurations your environment demands.

You can also use SCCM, if your environment can justify the cost, to automate this process to a complete “Zero-Touch” solution.  My environment does not allow this because we are not a centralized IT department with a standard “image” across all departments.  Setting up SCCM is cumbersome unless you have full access to the SCCM “site server(s)”.  Never-the-less, SCCM is extremely powerful and can manage all systems (servers, workstations, etc.) in an automated way – but again, it’s pricey.

If you choose to solely use a “fat” image and decide to just use a WinPE disc or even Windows Deployment Servers (WDS), just make sure that you update your image every month or at-least quarterly – and do not, I repeat, do not, join it to your domain/network without it being fully patched.

Deploying Operating Systems is a fairly complicated affair, and we need to utilize the tools available to us – but don’t forget about our third party applications as well.  In my environment, most malware outbreaks are caused by either two types of incidents:

  • Third party products are out of date and malware droppers are taking advantage (either in advertising sites or plan malicious sites) of these exploits.
  • Phishing attempts

Maintaining our applications is also a crucial step that cannot be overlooked.  Again, you can utilize SCCM for this process (if you can justify it) or you can use additional third party products (Ninite, Secunia PSI, WSUS, etc.).  No matter what you use, you need to make sure that all of your systems are updated, and be able to report on this.

Having the ability to view your network/systems is a crucial part of a proper “Patch Management” strategy, so you need to have continual scanning on your network (with the ability to report on systems).  You can either use Nessus, SCCM, QualysGuard, etc., but no matter what, you need this data.  Again, utilize the tools you have – LEARN POWERSHELL!  PowerShell can give you crazy amounts of data – use it, love it, live it.

The last part of this discussion is about anti-virus/malware software.  Depending on the solution, your organization is using, you should be able to alert on infected systems.  If you’re using Microsoft ForeFront Endpoint Protection, then well you may not be able to (besides using PowerShell to gather the log files). It would be preferred if you have a anti-virus/malware solution that has an administrative console or the ability to run reports.

If you don’t have a A/V solution that has this capability, then you need to rely on your Windows Logs and parse them with either Splunk or LogStash or something similar.  Utilizing a system that can correlate this data for you is of immense help – especially if this repository is the same repository as your IDS/IPS logs, Windows Event Logs, etc.

Having the ability to fully patch a system before it is deployed is crucial in every environment.  One piece of malware (with a C2) can scan your entire network for a new server and then as soon as a “SysAdmin” logs in…… well, the game is over – time to rebuild.

MDT 2013: Installing MDT 2013

Now we are going to install MDT 2013. This is a simple process but I wanted to show you anyways.

After you have downloaded MDT 2013 from Microsoft (See This Post)

When you first Launch the MDT 2013 Installer, you should see the following screen:

MDT2013_1

Click Next to Continue

MDT2013_2

Accept the License Agreement and click Next:

MDT2013_3

Choose the Location that you want MDT 2013 to be installed.  This is typically left alone but you are more than welcome to install it on a separate partition/drive.  Once you’ve chosen the appropriate location, Click Next:

MDT2013_4

I typically choose not to join their CEIP but it’s up to you.  Click Next:

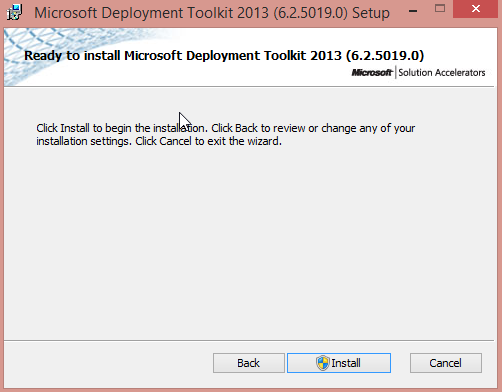
MDT2013_5

Now, Click Install

That’s It!  It’s pretty straight forward….  Now onto the good stuff!  We will be setting up our MDT 2013 Deployment Share in the next post.

Also, I am in the process of making a video that will explain and show all of these steps

Enjoy!